
Creating a New Event, Adding an Event in Currinda,
Adding a New Event
The power of Currinda lies in its ability to link all of your event's key elements into a relational structure that gives you total oversight and control as an administrator. Meanwhile, your guests enjoy the smoothest registration experience.THIS ARTICLE steps you through the simple process to create a new event on Currinda. (Click or tap the images to enlarge)TIP: Also, you're always welcome to use our in-app chat button (connects to our online Help Desk) or email support@currinda.com for any questions we can answer to help you along).
1) Add New Event Tab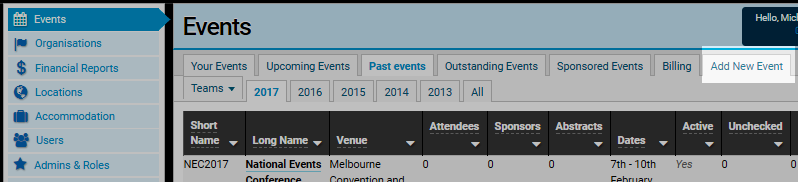
To create or add a new event on Currinda, open the Add New Event tab located on your horizontal tabs menu.Your new event setup commences at the Details > General tab (Currinda will default straight to this screen). General setup details are clearly defined.After saving your General Setup screen, proceed along each tab in left to right sequence on your horizontal tabs menu. Save each screen as you go.TIP: In Currinda, the horizontal tabs menu is generally arranged in the logical order for setup workflows.
2) The Details Tab
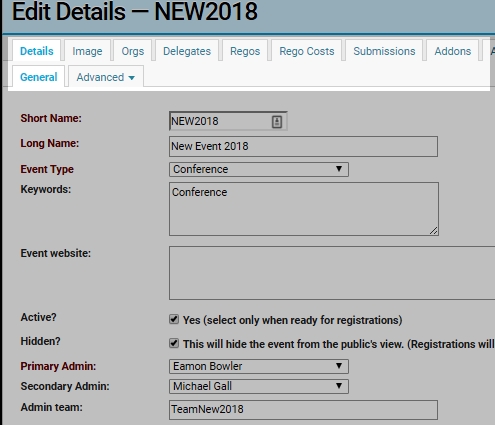
The General tab sets out your event's general setup information, including event name, location, venue, admin information and cut-off dates. The Advanced tab contains your configuration tools for Financial, Invoice, Email, Additionals (including options for your event Banner, Certificate of Attendance, Nametags and various file uploads), Theme (colour and font schemes for your registrations portal) and Social (options to integrate your event with social media platforms).
3) The Image Tab
The Image tab allows you to upload image files for display across the various documents (inc. invoices, Certificates of Attendance, etc) and screens (inc. registration portals, event apps and websites) relating to your new event.Generally speaking, the two most important images to upload are the banner and the square (1:1). The banner image will appear throughout the delegate's registration workflow screens. The square image will appear on invoices and other selected documents.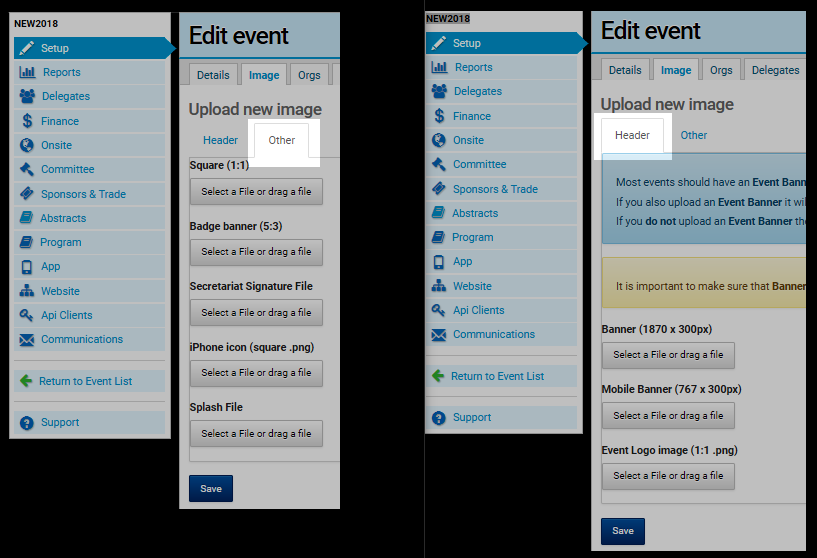 TIP: Currinda helps you to ensure that your selected images are configured to the best size dimensions for each type of screen/device by telling you recommended dimensions. Nevertheless, Currinda allows variations of image size to be uploaded. Your uploaded images will appear as a 'best fit' for the respective device types.
4) The Orgs Tab
The next step of the setup process is linking the event to a Hosting Organisation/s. One or more linked organisations can be classified as a Hosting organisation. The Orgs screen permits the 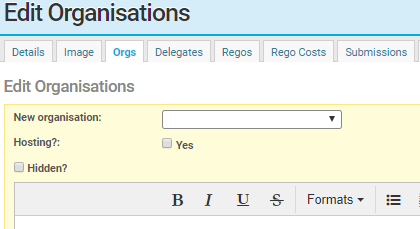 creation of Hosting status via a simple checkbox.Managed and non- managed organisations can both be added via the Orgs tab.Depending on your event, it may be useful for you to create Member and Non-Member delegate types and registration types.TIP: In order to link an Organisation to your event (via the Events > Orgs tab), you must first ensure that the Organisation has been CREATED. You can create a new organisation in the Organisations setup tab (via the LHS Verticle tabs menu on your dashboard screen).
5) The Delegates Tab
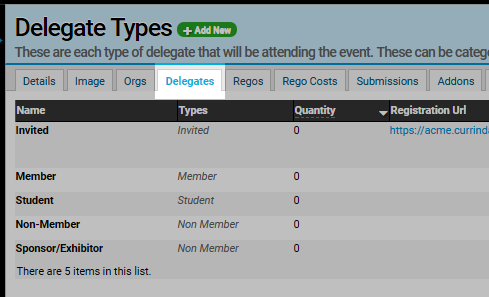
The next step in your process will be creation of Delegate Types via the Delegates tab. Your Delegate Types identify the basic classes of delegate that will be attending the conference. Some of the most common delegate types include Invited - Member - Student - Non-member - Sponsor: Currinda has prepopulated these types in your Delegates screen, but you can override these and add new delegate types as you wish.Your event's Delegate Types typically form one side of the registration pricing matrix.TIP: There is no limit to the number of Delegate Types that can be added to your event, but it's a good idea to avoid too many different types in order to minimise the complexity of your registration cost structure ('registration pricing matrix').All invited and trade delegate types are hidden. This gives them a separate URL that can be used to register them. This means they are not part of the regular registration process.
6) The Regos Tab
The next step is adding Registration Types via the Regos tab. Some of the most common registration types include Full Registration - Day Registration - Worshop Only - Cancelled 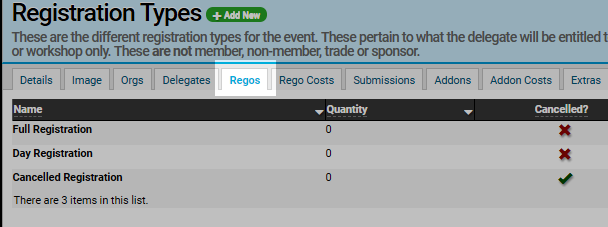 Registration: Currinda has prepopulated these types in your Regos screen, but you can override these and add new delegate types as you wish.Typically, your event's Registration Types should be based on the entitlements 'package' that a delegate will receive at the event. Each individual registration can select only one Registration Type, which will also be the basis for other any Addons or Extras offered during the registration process.Note that Currinda provides separate steps for additional extras (Addons and/or Extras) later in your Setup process (explained below).TIP: Pricing for registration types is setup in the next step (see Rego Costs below), but it's worth remembering that prices are generally based on the 3 elements or Delegate Types (previous Step), Registration Types (this Step) and Timeframes (next Step).These can include things such as included dinner tickets, however these are typically offered as free Addons.
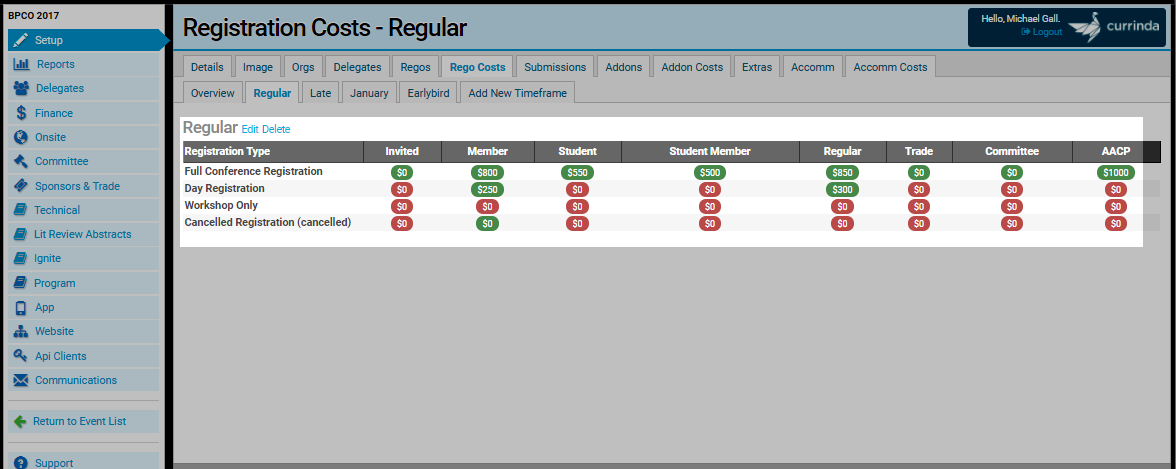
7) The Rego Cost Tab
The Rego Costs tab enables specific Item Costs within the registration pricing matrix. Each point on this matrix can be configured as follows:Enabled (green);Disabled (red);Set at a specific price; andAllocated as group pricing.This allows you to set different prices for your attendees by combinations of Delegate Type and each Registration Type.Some examples: - Member Day Registration costs $200 - Non-Member Day Registration costs $300 - Student Day Registration costs $250.TIP: In the matrix, red costs are disabled and green costs are enabled. Disabled costs will never be displayed to your delegates and are fine to be left as showing in the the grid (see example HERE).
8) Add Time Frames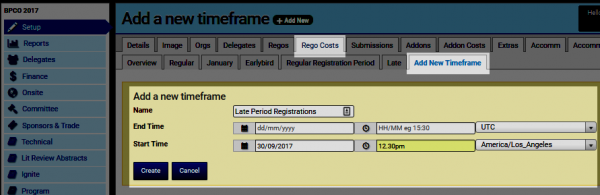
Using the Rego Costs tab will also allow you to add timeframes to your event's registrations schedule. This means that you can create registration offers based on, for example, earlybird or late registrations via the Rego Costs > Earlybird tab and Rego Costs > Late tab respectively. There is further information about this here.
9) Add Addons
The next step is adding Addons, which is covered in the Addon Guide. Add-ons are an important part of 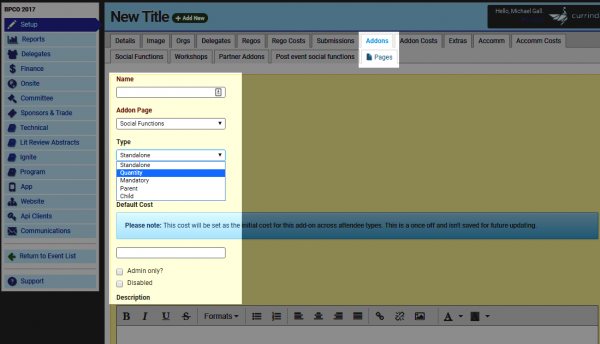 event setup as they provide the mechanism to track and charge for "secondary" parts of events, such as: individual workshops; social functions; transport options. Currinda enables you to create Addons with, or without, costs.
10) Adding Extras
Currinda provides the Extras tool to allow enormous flexibility in your event's registrations process, and assist your event's accreditation and verification requirements and other information needs.Extras are essentially questions asked of your delegates and the information requirements can configured in up to ten response formats, including document/image uploads. Extras questions can be Mandatory or non-mandatory.TIP: Each Extra can be linked to any other field of information - Addon, Delegate Type, Registration Type, or Linked Organisation - for enormous flexibility to configure your event for your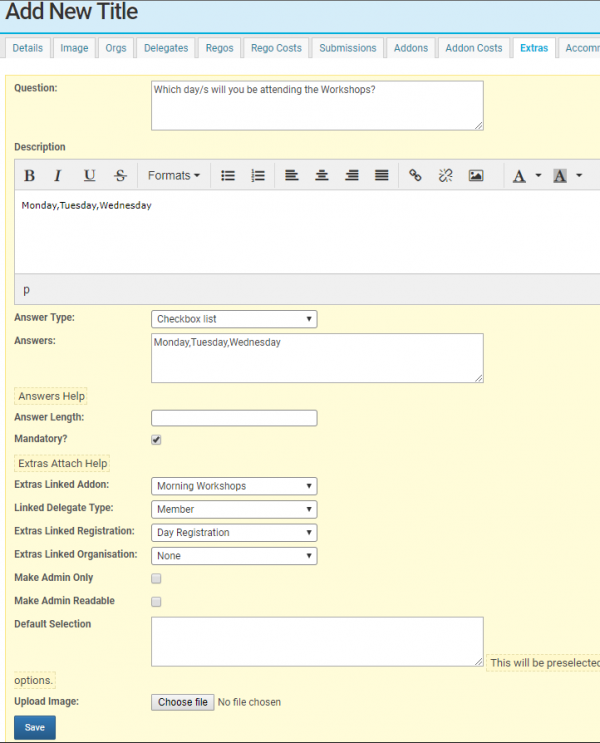 exact requirements. If you need our help to work out the best application of the Extras tool for your next event, contact our Online Help Desk or email support@currinda.com.Currinda's Extras form includes the options 'Make Admin Only' and 'Make Admin Readable', which event administrators may use to render an Extras item editable and/or viewable only by the Event administrators. This feature can be usefully applied to issues such as security clearances.Also, remember that your Extras questions may be flexibly configured to appear at different stages of the delegate's event registration process. For example, Extras items may be:
- Attached to a specific Linked Organisation which the delegate selects. eg. "What is your membership number?"
- Attached to a Registration Type. eg. "Which day will you be attending?"
- Attached to an Addon. eg. "Which workshop will you attend?"
- Or unattached. eg. "Are you interested in being contacted regarding further events?"
11) Set up Accommodation Options
Finally, Currinda allows you to setup any accommodation options applicable to the event. There is further information about this here Events - Accommodation rooms and pricing.